Installing Pydantic AI
Before building AI agents, structured workflows, and tool-calling systems, you first need to set up a proper development environment for PydanticAI.
Fortunately, getting started with Pydantic AI is relatively straightforward if you already have basic Python experience.
In this guide, you will learn:
- how to install Pydantic AI,
- how to create a clean Python environment,
- how to configure API keys,
- how to verify the installation,
- and how to prepare your first AI agent project.
By the end of this tutorial, you will have a working development setup ready for building structured AI systems.
What You Need Before Installing Pydantic AI
Before starting, make sure you have:
- Python installed
- a code editor
- terminal or command-line access
- an API provider account
Recommended tools:
- Python 3.10 or newer
- VS Code
- Git
- pip
- virtual environments
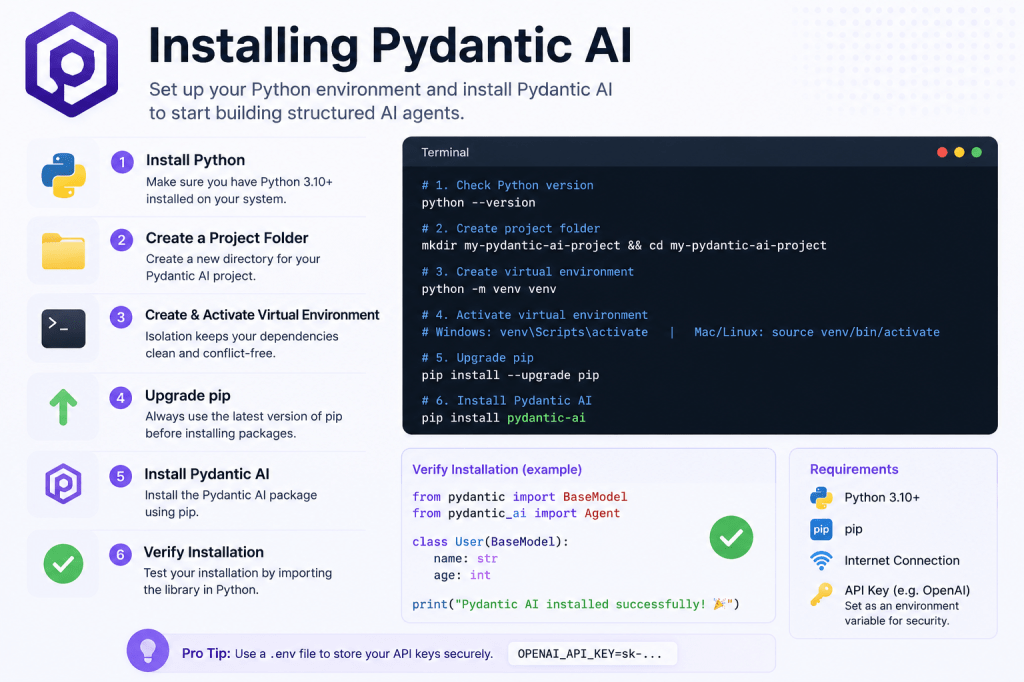
Step 1 — Install Python
Pydantic AI is built for Python, so the first step is ensuring Python is installed correctly.
Check Your Python Version
Open your terminal and run:
python --version
or:
python3 --version
You should see something similar to:
Python 3.11.5
If Python is not installed, download it from:
Step 2 — Create a Project Folder
Create a dedicated folder for your first Pydantic AI project.
Example:
mkdir first-pydantic-ai-projectcd first-pydantic-ai-project
Keeping projects isolated makes dependency management much easier.
Step 3 — Create a Virtual Environment
Using virtual environments is strongly recommended.
Virtual environments isolate project dependencies so different projects do not conflict with each other.
Create the Virtual Environment
Mac/Linux:
python3 -m venv venv
Windows:
python -m venv venv
Step 4 — Activate the Virtual Environment
Mac/Linux
source venv/bin/activate
Windows
venv\Scripts\activate
Once activated, you should see something similar to:
(venv)
at the beginning of your terminal prompt.
Step 5 — Upgrade pip
Before installing packages, upgrade pip.
pip install --upgrade pip
This helps avoid dependency installation issues.
Step 6 — Install Pydantic AI
Now install PydanticAI.
pip install pydantic-ai
Depending on your internet connection, installation may take a minute.
Pip will automatically download:
- Pydantic AI,
- Pydantic,
- and required dependencies.
Step 7 — Verify the Installation
After installation, test whether Pydantic AI was installed successfully.
Create a new Python file called:
test_install.py
Add the following code:
from pydantic import BaseModelclass User(BaseModel): name: str age: intuser = User(name="Alice", age=30)print(user)
Run the script:
python test_install.py
Expected output:
name='Alice' age=30
If you see this output, your environment is working correctly.
Step 8 — Install an AI Model Provider SDK
Pydantic AI usually works alongside AI model providers such as:
For example, if you plan to use OpenAI models:
pip install openai
Step 9 — Create an API Key
Most AI providers require an API key.
For example, OpenAI API keys can be created from:
Never hardcode API keys directly into production applications.
Step 10 — Create an Environment Variable
Environment variables are the safest way to store API credentials.
Mac/Linux
export OPENAI_API_KEY="your_api_key_here"
Windows
set OPENAI_API_KEY=your_api_key_here
Step 11 — Test Your Environment
Create a new file:
simple_agent.py
Example starter code:
import osapi_key = os.getenv("OPENAI_API_KEY")print("API Key Loaded:", bool(api_key))
Run:
python simple_agent.py
If successful:
API Key Loaded: True
Recommended Development Tools
VS Code
Visual Studio Code is one of the best editors for Python AI development.
Useful extensions:
- Python
- Pylance
- Ruff
- Jupyter
- GitLens
Recommended Project Structure
As your projects grow, organize files properly.
Example structure:
project/│├── agents/├── models/├── tools/├── workflows/├── tests/├── main.py├── requirements.txt└── .env
Good structure becomes increasingly important for larger AI systems.
Common Installation Problems
Problem 1 — Python Version Too Old
If installation fails, check your Python version.
Pydantic AI works best with modern Python versions.
Problem 2 — Virtual Environment Not Activated
If packages appear missing, your virtual environment may not be active.
Look for:
(venv)
in your terminal.
Problem 3 — pip Not Found
Try:
python -m pip install pydantic-ai
instead of:
pip install pydantic-ai
Problem 4 — API Key Errors
Always verify:
- the API key exists,
- the environment variable is loaded,
- and billing is enabled on your provider account.
Why Virtual Environments Matter
Many beginners skip virtual environments early on.
This usually creates problems later:
- conflicting package versions,
- broken dependencies,
- global installation issues,
- and difficult debugging.
Using isolated environments from the beginning is a professional development habit worth learning early.
What You Should Learn Next
Now that your environment is ready, the next step is building your first actual AI workflow.
Recommended next tutorials:
- Your First Pydantic AI Agent
- Understanding Structured Outputs
- Introduction to Pydantic Models
- Tool Calling Explained
- Building Stateful AI Agents
These tutorials will gradually introduce the core concepts behind production AI engineering.
Final Thoughts
Installing Pydantic AI is the first step toward building structured AI systems with Python.
While many AI tutorials focus only on prompts, Pydantic AI encourages developers to think more like software engineers:
- using schemas,
- validation,
- structure,
- typed outputs,
- and maintainable workflows.
That mindset becomes increasingly important as AI systems grow more complex and production-oriented.
With your development environment ready, you are now prepared to begin building your first real AI agents.
👉 You can experiment with a practical PydanticAI implementation of this concept in the official GitHub repository for the LearnPydanticAI examples: https://github.com/BenardoKemp/learn-pydantic-ai
