After installing PydanticAI and setting up your Python environment, the next step is building your first actual AI agent.
This is where things become exciting.
Instead of simply sending prompts to a language model, you will begin creating structured AI systems that:
- validate outputs,
- use typed schemas,
- interact with tools,
- and behave more like real software applications.
In this tutorial, you will build a simple Pydantic AI agent step by step.
By the end of this guide, you will understand:
- what an AI agent is,
- how Pydantic AI agents work,
- how to define structured outputs,
- and how to run your first working agent in Python.
What Is an AI Agent?
An AI agent is a system capable of:
- receiving input,
- reasoning about tasks,
- generating outputs,
- and optionally interacting with tools or external systems.
Unlike a simple chatbot, agents can:
- follow workflows,
- validate information,
- execute actions,
- and operate semi-autonomously.
Examples include:
- research assistants,
- coding assistants,
- automation systems,
- data extraction agents,
- and workflow orchestrators.
Pydantic AI helps developers build these systems using structured Python models.
What You Will Build
In this tutorial, you will create a basic AI agent that:
- receives a user request,
- generates structured output,
- validates the response using Pydantic,
- and returns reliable typed data.
The final result will look something like this:
User Input:"Generate a user profile"AI Output:{ "name": "Alice Johnson", "email": "alice@example.com", "active": true}
Instead of raw text, the output becomes validated Python data.
Step 1 — Install Required Packages
If you have not already installed Pydantic AI, run:
pip install pydantic-ai openai
This installs:
- Pydantic AI,
- OpenAI SDK,
- and required dependencies.
Step 2 — Set Your API Key
Set your OpenAI API key as an environment variable.
Mac/Linux
export OPENAI_API_KEY="your_api_key_here"
Windows
set OPENAI_API_KEY=your_api_key_here
Step 3 — Create Your First Agent File
Create a new Python file:
first_agent.py
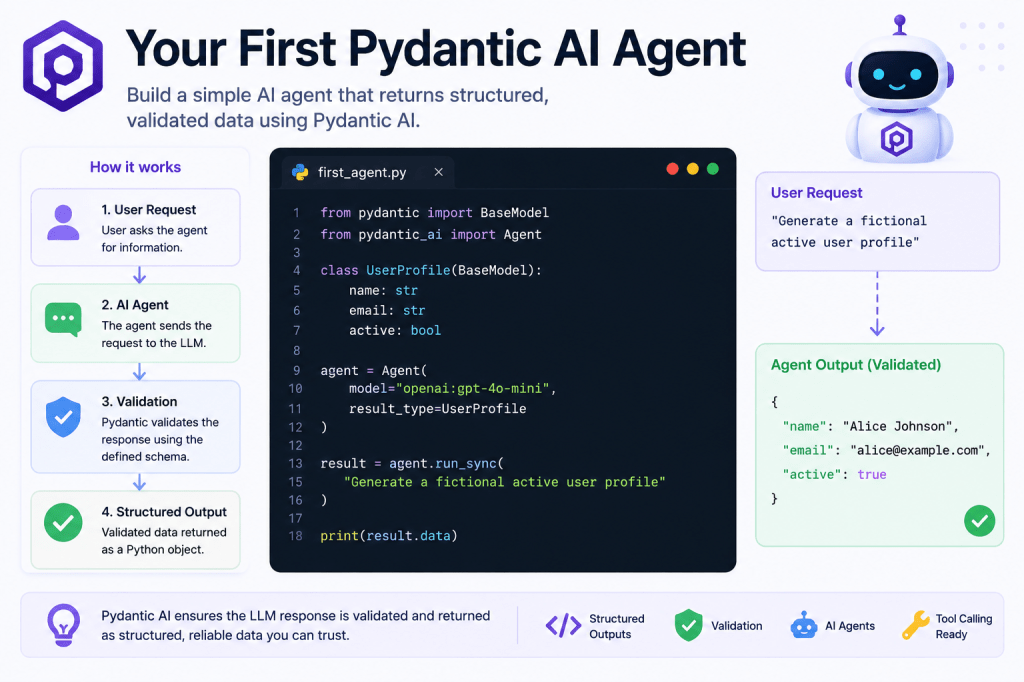
Step 4 — Import Required Libraries
Add the following imports:
from pydantic import BaseModelfrom pydantic_ai import Agent
Here:
BaseModeldefines structured schemasAgentcreates the AI agent itself
Step 5 — Create a Structured Output Model
Now define the structure your AI response should follow.
class UserProfile(BaseModel): name: str email: str active: bool
This schema tells the AI system:
- exactly what fields must exist,
- what data types are expected,
- and how the output should be validated.
This is one of the biggest differences between Pydantic AI and traditional prompting.
Step 6 — Create the Agent
Now create the actual AI agent.
agent = Agent( model="openai:gpt-4o-mini", result_type=UserProfile)
Let’s break this down.
model
model="openai:gpt-4o-mini"
This selects the language model.
result_type
result_type=UserProfile
This tells Pydantic AI:
- validate the output,
- and convert it into a structured Python object.
Step 7 — Run the Agent
Now ask the agent to generate data.
result = agent.run_sync( "Generate a fictional active user profile")
This sends the request to the model.
Step 8 — Print the Result
Add:
print(result.data)
Complete example:
from pydantic import BaseModelfrom pydantic_ai import Agentclass UserProfile(BaseModel): name: str email: str active: boolagent = Agent( model="openai:gpt-4o-mini", result_type=UserProfile)result = agent.run_sync( "Generate a fictional active user profile")print(result.data)
Step 9 — Run the Script
Execute:
python first_agent.py
Example output:
name='Alice Johnson'email='alice@example.com'active=True
Congratulations.
You just built your first structured AI agent.
Why This Is Important
This example may look simple, but it introduces one of the most important ideas in modern AI engineering:
AI outputs should behave like application data.
Traditional prompting often returns unpredictable text.
Pydantic AI converts AI responses into:
- typed Python objects,
- validated schemas,
- and structured workflows.
This creates systems that are:
- easier to trust,
- easier to debug,
- and easier to scale.
Understanding What Happened Internally
Behind the scenes, the workflow looks like this:
User Prompt ↓LLM Generates Response ↓Pydantic Validates Output ↓Structured Python Object Returned
If the model generates invalid output:
- validation can fail,
- retries can happen,
- or errors can be handled safely.
This is a major improvement over fragile text parsing.
What Makes Pydantic AI Different?
Many AI tutorials rely on prompts like:
Return valid JSON with:nameemailactive
But models do not always follow instructions perfectly.
Pydantic AI adds:
- validation,
- parsing,
- type safety,
- and structure.
That creates more reliable AI systems.
Adding Better Instructions
You can improve outputs by giving more detailed prompts.
Example:
result = agent.run_sync( """ Generate a fictional active user profile. Use realistic names and email addresses. """)
Prompt quality still matters, even with structured validation.
What Happens If the Model Fails?
Suppose the model returns:
{ "name": "Alice"}
The schema expects:
- name
- active
Validation would fail because fields are missing.
This prevents invalid data from silently entering your system.
That reliability is one of the biggest advantages of Pydantic AI.
Real-World Applications
This same pattern scales into much larger systems.
Examples include:
AI Research Agents
Return structured research summaries.
Workflow Automation
Generate validated business actions.
Data Extraction Systems
Extract structured data from documents.
AI Coding Assistants
Return structured code analysis.
API Orchestration
Coordinate external systems safely.
Common Beginner Mistakes
1. Forgetting API Keys
Always verify:
- environment variables are set,
- and billing is enabled.
2. Invalid Model Names
Use supported provider model names.
3. Overcomplicated First Projects
Start simple.
Focus on:
- schemas,
- validation,
- and basic workflows first.
4. Ignoring Validation
The structured output system is the main advantage of Pydantic AI.
Do not skip it.
Improving Your First Agent
After this tutorial, you can gradually add:
- more complex schemas,
- nested models,
- tool calling,
- memory systems,
- retries,
- async execution,
- and workflow orchestration.
This is how small examples evolve into real AI systems.
What You Should Learn Next
Recommended next tutorials:
- Understanding Structured Outputs
- Introduction to Pydantic Models
- Tool Calling Explained
- Building Stateful AI Agents
- Async AI Agents with Python
These topics form the foundation of production AI engineering.
Final Thoughts
Your first Pydantic AI agent demonstrates an important shift happening across AI development.
The industry is moving away from:
- fragile prompts,
- unpredictable outputs,
- and raw text parsing.
Instead, developers are building:
- validated systems,
- structured workflows,
- typed outputs,
- and production-ready AI architectures.
Pydantic AI makes that transition much easier for Python developers.
This small project is the first step toward building far more advanced AI agents and automation systems.
👉 You can experiment with a practical PydanticAI implementation of this concept in the official GitHub repository for the LearnPydanticAI examples: https://github.com/BenardoKemp/learn-pydantic-ai
